

The first time I baked Garlic Rosemary No-Knead Bread was during a snowy winter in New York. I was living in a small apartment, craving comfort food, and the smell of fresh garlic and rosemary filled the air as the bread baked in my Dutch oven. It reminded me of cozy evenings at neighborhood bakeries, yet it was something I created with my own hands. That moment made me realize bread baking didn’t have to be complicated.
This recipe is simple, approachable, and incredibly rewarding. The no-knead method allows anyone, from beginner bakers to seasoned pros, to craft bakery-quality bread with just a few ingredients and patience. Thanks for being here. I hope these recipes bring warmth to your kitchen and a little joy to your day.
Table of Contents


What Makes Garlic Rosemary No-Knead Bread Special
The Magic of No-Knead Technique
No-knead bread became popular thanks to its ease. Instead of hours of kneading, you let time do the work. A long fermentation develops gluten naturally, producing an airy crumb and chewy texture.
Why Garlic and Rosemary Pair So Well
Garlic brings savory depth, while rosemary adds earthy fragrance. Together, they transform a simple loaf into an aromatic centerpiece. This flavor pairing is rooted in Mediterranean traditions, where herbs and garlic often elevate bread and stews.
Key Ingredients for Garlic Rosemary No-Knead Bread
One of the beauties of this recipe is its simplicity. You only need a handful of pantry staples, yet each one plays a big role in flavor, texture, and crust.
Flour: The Backbone of the Bread
Most no-knead bread recipes use all-purpose flour, which works perfectly for this loaf. It has the right balance of protein for gluten development without being too chewy.
If you want to experiment, here are options:
- Bread flour → Creates a slightly chewier loaf with more structure.
- Whole wheat flour → Swap up to 30% of the flour for whole wheat to add fiber and a nutty flavor.
- Gluten-free flour → A 1:1 gluten-free blend can work, but expect a denser loaf.
Garlic: Sweet, Nutty, and Aromatic
Garlic is the star here. You can use it in different ways depending on the flavor you want:
- Roasted garlic → Soft, spreadable, sweet, and caramelized.
- Fresh minced garlic → Stronger, sharper bite.
- Garlic powder → A backup option if you don’t have fresh cloves.
For best results, roast a head of garlic in the oven before folding it into the dough. The cloves will melt into the bread and infuse every bite.
Rosemary: Fresh vs. Dried
Fresh rosemary is always best, but dried can work if that’s what you have.
- Fresh rosemary → Chop finely. It’s fragrant but not overpowering.
- Dried rosemary → Use half the amount, as the flavor is more concentrated.
Tip: Lightly bruise rosemary leaves before adding to release natural oils.
Yeast: The Leavening Power
You can use instant yeast or active dry yeast. Both work, but instant yeast skips the activation step.
The beauty of no-knead bread is the long fermentation time. Even a small amount of yeast works its magic over 12–18 hours, giving the bread a deep, slightly tangy flavor.
Salt and Water
Salt balances flavors, enhances crust, and helps regulate yeast activity. Don’t skip it.
Use filtered water if your tap water is very hard or heavily chlorinated, as that can affect yeast.
Ingredient Table
| Ingredient | Amount (Standard) | Notes & Substitutions |
|---|---|---|
| All-purpose flour | 3 cups (360 g) | Can sub bread flour or mix with whole wheat |
| Warm water | 1 ½ cups (350 ml) | Room temperature, not hot |
| Salt | 2 tsp | Kosher or sea salt preferred |
| Yeast | ½ tsp | Instant or active dry |
| Garlic | 1 head, roasted | Or 3–4 cloves minced |
| Fresh rosemary | 2 tbsp, chopped | Or 1 tbsp dried rosemary |
Step-by-Step Guide: Garlic Rosemary No-Knead Bread

This bread is hands-off but does require patience. The secret is time.
Step 1: Mix the Dough
In a large bowl, whisk flour, yeast, and salt together. Stir in warm water until a sticky, shaggy dough forms. Fold in roasted garlic and chopped rosemary.
💡 Tip: The dough will look messy and wet—that’s exactly what you want. Don’t be tempted to add more flour.
Step 2: Let It Rest (Fermentation)
Cover the bowl with plastic wrap or a clean towel. Let it rest at room temperature for 12–18 hours.
- The dough will double in size.
- It will look bubbly on the surface.
- The smell should be slightly yeasty, nutty, and herbal.
This long fermentation develops gluten naturally, no kneading required.
Step 3: Shape the Dough
After fermentation, lightly flour a surface. Gently turn the dough out, being careful not to deflate it too much. Shape into a ball by folding the edges toward the center.
💡 Tip: Handle with care. You don’t need to punch down like traditional dough.
Step 4: Second Rise
Place dough on parchment paper, seam side down. Cover and let rise for 30–60 minutes while the oven preheats.
Meanwhile, place a Dutch oven with lid inside your oven. Preheat to 450°F (230°C).
Step 5: Bake the Bread
Carefully remove the hot Dutch oven, lift dough with parchment, and place inside. Cover with lid.
- Bake 30 minutes covered (steam helps create crust).
- Remove lid and bake another 10–15 minutes uncovered, until deep golden brown.
Step 6: Cool Before Slicing
Transfer bread to a wire rack and cool for at least 1 hour. This prevents the inside from becoming gummy.il golden.
Nutritional Breakdown and Health Benefits
| Nutrient (per slice, approx) | Amount |
|---|---|
| Calories | 140 |
| Carbohydrates | 27 g |
| Protein | 4 g |
| Fiber | 2 g |
| Fat | 2 g |
Benefits of Rosemary and Garlic

Garlic supports heart health and boosts immunity (Healthline). Rosemary is rich in antioxidants and may improve memory and digestion.
Serving Ideas: What Goes Well With Garlic Rosemary Bread
Soups and Stews
Serve with tomato soup, beef stew, or minestrone.
Breakfast Spreads
Top with butter, cream cheese, or avocado.
Entertaining Platters
Slice into cubes for charcuterie boards with cheese, olives, and spreads.
Tips, Tricks, and Troubleshooting
Crust Problems
If the crust is too hard, wrap the bread in a towel as it cools.
Flavor Boosters
Add roasted garlic, parmesan, or sun-dried tomatoes for variety.
FAQs About Garlic Rosemary No-Knead Bread
What is no-knead bread?
It’s a bread-making method where gluten develops during a long rise, removing the need for kneading.
Can I use dry rosemary?
Yes, but reduce to 1 teaspoon since dried herbs are stronger.
How long does it stay fresh?
Stored in a bread bag, it stays fresh for up to 3 days.
Can I freeze this bread?
Yes. Slice, wrap in foil, and freeze for up to 2 months.
Conclusion: Bringing Warmth to Your Kitchen
Garlic Rosemary No-Knead Bread is a reminder that comfort food doesn’t need to be complicated. With simple ingredients and a little patience, you can enjoy bakery-quality bread at home. If you’d like more easy homemade recipes, check out this collection of comforting meals.
Print

Garlic Rosemary No-Knead Bread Recipe – Easy & FlavorfulGarlic
- Total Time: 45 minutes
- Yield: 1 round loaf (8–10 slices) 1x
Description
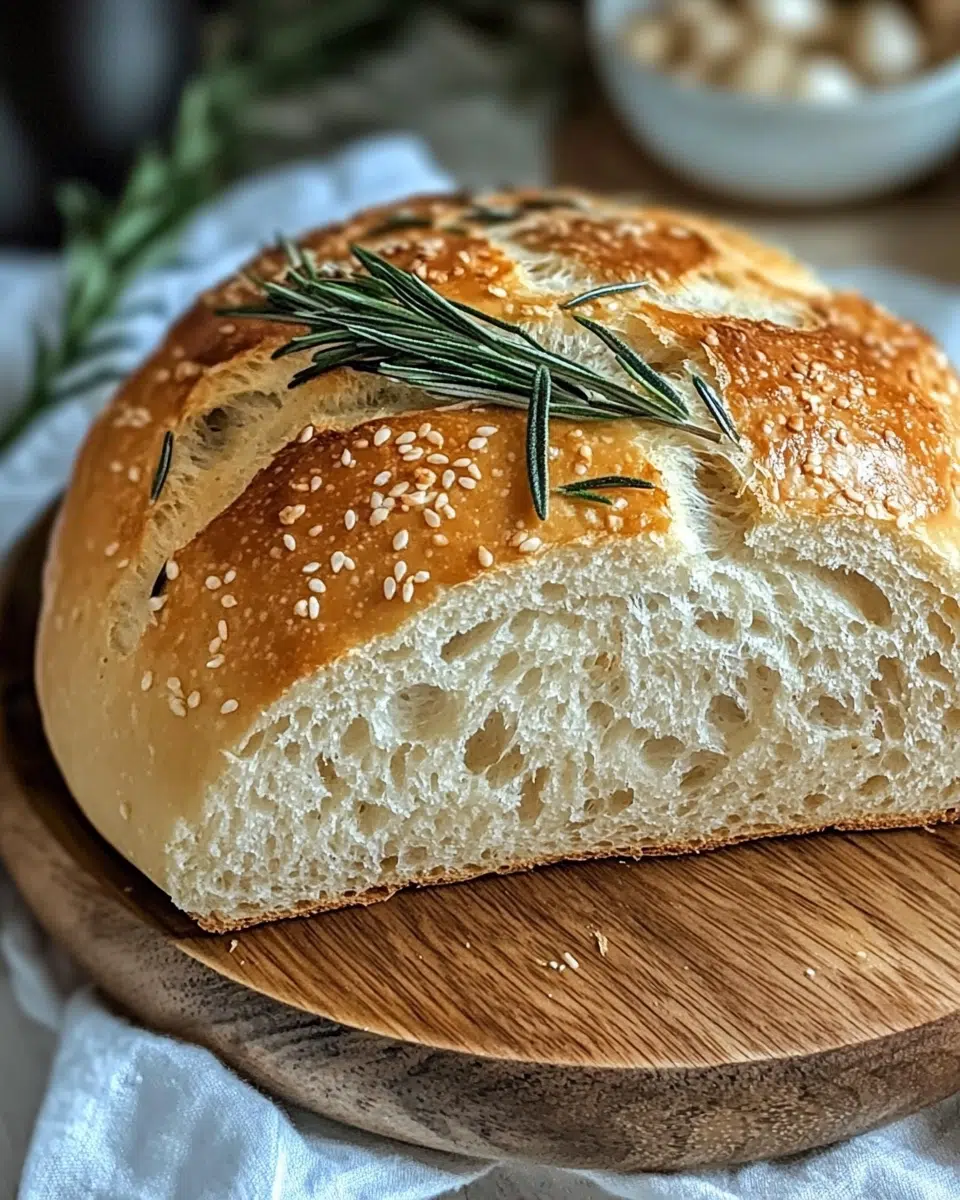
This Garlic Rosemary No-Knead Bread is a rustic, artisan-style loaf with a golden crust, fluffy interior, and irresistible aroma of roasted garlic and fresh rosemary. The best part? You don’t need to knead the dough—just mix, rest, and bake in a Dutch oven for bakery-quality results right at home.
Ingredients
3 cups (360 g) all-purpose flour (or bread flour)
1 ½ cups (350 ml) warm water (room temperature)
2 tsp kosher salt (or sea salt)
½ tsp instant yeast (or active dry yeast)
1 head roasted garlic, cloves mashed (or 3–4 cloves fresh minced)
2 tbsp fresh rosemary, finely chopped (or 1 tbsp dried rosemary)
Optional toppings: extra rosemary sprigs, coarse sea salt, olive oil drizzle
Instructions
-
Mix the Dough: In a large bowl, whisk flour, salt, and yeast. Stir in water until dough forms. Add roasted garlic and rosemary, mixing until just combined. Dough will be sticky and shaggy.
-
First Rise: Cover bowl with plastic wrap or towel. Let dough rest at room temperature for 12–18 hours, until bubbly and doubled in size.
-
Shape Dough: Lightly flour surface, turn out dough, and gently shape into a ball. Place on parchment paper seam-side down.
-
Second Rise: Cover dough loosely. Let rise 30–60 minutes while preheating oven. Place Dutch oven (with lid) inside oven and preheat to 450°F (230°C).
-
Bake Covered: Using parchment, carefully transfer dough to hot Dutch oven. Cover with lid and bake for 30 minutes.
-
Bake Uncovered: Remove lid and bake another 10–15 minutes, until crust is deep golden brown.
Cool and Slice: Transfer loaf to wire rack. Let cool at least 1 hour before slicing to set crumb structure.
Notes
For extra flavor, brush crust with olive oil before final bake.
Swap up to 30% of flour with whole wheat for nuttier flavor.
Garlic can be roasted ahead of time and stored in fridge.
Store bread at room temp in paper bag for 2–3 days, or freeze for up to 2 months.
- Prep Time: 15 minutes
- Cook Time: 12–18 hours
- Category: Low-Carb Recipes, Healthy Snacks
- Cuisine: American, Southern
Nutrition
- Calories: 180
- Sugar: 0.5 g
- Sodium: 320 mg
- Fat: 2 g
- Carbohydrates: 34 g
- Fiber: 2 g
- Protein: 5 g


